A "special" emblem back there as a hitch plug would be different!
More fabrication tasks getting done. And I finished up when it was still daylight!!
How do you located a fuel filler in a tank, and not butcher a hood getting access to it? It is much easier if you are starting from scratch.
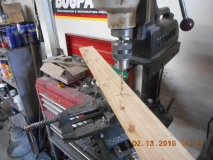
I set up a simple "poor boy" jig to locate the filler. It is nothing more than a board with a hole in it. I did go all technical and drill the hole with the drill press to get it straight.

Then place an shim the board on the fenders so it can be relocated when the hood is off. Note that the board does not touch the hood so it is independent of the hood positioning. The board is also marked so it can be removed and set back in the same spot each time the hood is removed/installed. I even shaved/tapered the board ends so it would lay parallel with the hood to locate the filler perpendicular to the hood and allow the filler cap to lay evenly on the hood.


Measure, measure, measure then measure again to properly position the exact location of the new filler riser. This will be transferred to the hood to drill the hood.


Put the hood back on and drill the pilot hole.

Drill the 3 inch diameter hole. This is larger than the 2 inch filler tube to allow for the seal gromet. The Gromet is for a '71 - '72 chevy pickup fuel tank filler.

Cool!!! Hit my mark almost dead on.

Now is a good time to check my fiberglass skills. Since this hole goes right through the formerly repaired hole, it will show if I am not getting good lamination, too much resin, or not enough resin. Looks really good and I am pleased. Polish the rough edge with some 80 grit paper so it wil not cut the rubber gromet and it is ready to go.

Position the filler riser tube and weld it in place.

Drill the interior of the riser tube.

Looks good and the tank is now finished and ready for the interior coating to seal any pin holes and guard against rust. Also check out the cut plug, hit the bulls eye!

Done. The flip top is a motorcycle BSA, Norton fuel filler flip cap that is also vented. So, no extra vent needed and no interior gas fumes making your Honey sick.


Here is what it replaced. A pipe with a pipe cap. The cap did have a vent hole drilled in the top. But also note that it stuck down into the tank. That limits to filling capacity. Welded on top, then drilled gets the maximum capacity for Brian's long trips. The 14 gauges metal patch welded on the top of the tank spreads the load and makes the filler really sturdy from flexing.

Nice, discrete and simple filler.


