First Build thread of 2015 and of the new Forum - Loretta
- joescoolcustoms
- Posts: 286
- Joined: Mon Jun 03, 2013 5:00 am
- Location: Saint Albans, WV
Re: First Build thread of 2015 and of the new Forum - Lorett
Joe,quick question on the rear toe...
How do you check that to be sure the rear wheels are centered when setting toe?To keep it from 'dog-legging' down the road like some old chevy nova's do?
Does that make sense?
Thanks
Tony
How do you check that to be sure the rear wheels are centered when setting toe?To keep it from 'dog-legging' down the road like some old chevy nova's do?
Does that make sense?
Thanks
Tony
"So i got that goin' for me,which is nice"
Re: First Build thread of 2015 and of the new Forum - Lorett
Oh and great looking rolling chassis!!
Tony
Edited for spelling
Tony
Edited for spelling
"So i got that goin' for me,which is nice"
- joescoolcustoms
- Posts: 286
- Joined: Mon Jun 03, 2013 5:00 am
- Location: Saint Albans, WV
Re: First Build thread of 2015 and of the new Forum - Lorett
Thank you Tony!
Very good question! I forgot to photo that part.
I roll the chassis forward, with the strings still tied to the wheel, 1/2 wheel revolution, until the strings point to the front and set up the jack stands in front of the chassis. Since the rear wheels offset about 1 1/2 inches more than the front, I measure between the string and the front wheel to get the rear pointed in the same direction as the front. This chassis was/is off 1/8 inch. That was as close to dead on as I could get and so close you will not see it "crab walk" or cause handling issues or tire scrub. Most stock VW's are within that tolerance.
Still just a simple approach. It is much easier to do this without a body, but with the high sides on a buggy body, it can still be done very easily. Just harder on an original VW unless the fenders are removed.
Hope that description makes sense.
- joescoolcustoms
- Posts: 286
- Joined: Mon Jun 03, 2013 5:00 am
- Location: Saint Albans, WV
Re: First Build thread of 2015 and of the new Forum - Lorett
Ba-Ling, Botta Bing! Chrome shop deliveries today.
Sweet job on the bumper! The Chrome shop just could not fit the rear bumper in their tank. The other rear bumper I had chromed was shorter because it was on a standard height buggy and I forgot that it was the biggest thing they could fit in the tank, so it wil get painted instead.
But, the front bumper was sooooo worth getting chromed. It will really set the front of the buggy off.
Tomorrow will be the deliveries from the Powder Coater.
- joescoolcustoms
- Posts: 286
- Joined: Mon Jun 03, 2013 5:00 am
- Location: Saint Albans, WV
Re: First Build thread of 2015 and of the new Forum - Lorett
Made a late evening run to the Powder Coater. Picked up a roll cage for Loretta, a chassis and nerf bars for another project.
The chassis was done in a 40% gloss, as was the nerf bars.
The roll cage was done in gloss black and it does shine! I was nervous about PC'ing a full cage because I had never done something that big before. I am really pleased with how it turned out.
That is some nice work to go along with the chrome front bumper. Gonna be a nice buggy!
Re: First Build thread of 2015 and of the new Forum - Lorett
I find it interesting that Loretta still has drum brakes all around. Even though I still have drums and they work fine many are going to disks up front.
- joescoolcustoms
- Posts: 286
- Joined: Mon Jun 03, 2013 5:00 am
- Location: Saint Albans, WV
Re: First Build thread of 2015 and of the new Forum - Lorett
These are the latest drums VW offered and Brian is not into firebreathing, horsepower oriented engines, but rather engines with more low end torque to cruise with. All the drum related hardware was in really nice condition. I can see updates over the years and disc's are a easy update for Loretta.
I on the other hand, like to try and spin the world backwards every time I start out from a stop. But mine still has drum brakes on all 4's, and did nicely across the US and back last year, including 3 days in the CO Rocky Mountains. Mine weighs exactly 1 ton and is no canyon carver, so drums work well for me.
Re: First Build thread of 2015 and of the new Forum - Lorett
Mike,
As Joe said, I'm not (yet) going big on the engine. I'm thinking the max I'll go is a 1776 (once I get the money up to redo the motor), if I don't go the Corvair route. The drum brakes were working great, and stopped her on a dime. Yes, she'll be a little heavier now, but the drums should be fine for quite a while (especially since they've been re-done again). Discs are something I may go to in the future.
I can't wait to see what she looks like with the body on! The excitement is building more and more every day!
(Loretta) Manx # M2940D910E on customized 1970 chassis that has been "Wheelerized" by Joescoolcustoms
(Scarlett) Manx Resorter #12 (R0012B931S) on 1969 chassis.
(Gunther) Manx 2 # A0202A035E
Tow'dster # TF530G913S
Original Home built buggy that I learned to drive in back in 1995 (the one that started my passion).
Club Member # 4436
Loretta: http://www.manxclub.com/forum/viewtopic ... t=3365Manx" onclick="window.open(this.href);return false;
Re: First Build thread of 2015 and of the new Forum - Lorett
Thanks Joe and Brian. I run the original single bowl master cylinder on my '65 chassis. My thought is it would be wise to go with the duel bowl for safety when maintenance requires. What type/brand(s) master cylinder and reservoir do you prefer on your builds?
- joescoolcustoms
- Posts: 286
- Joined: Mon Jun 03, 2013 5:00 am
- Location: Saint Albans, WV
Re: First Build thread of 2015 and of the new Forum - Lorett
I have had mixed results with the TRW/Varga MC's. I have used them for some time without problems, but on buggy's with little mileage usage. I put one on my Manx, 10,000 miles in 6 month's and it failed do to leaking in the front chamber. I will replace it with a OEM Brand in a week or two. Who knows? May have just got a bad one.Mike1991 wrote:Thanks Joe and Brian. I run the original single bowl master cylinder on my '65 chassis. My thought is it would be wise to go with the duel bowl for safety when maintenance requires. What type/brand(s) master cylinder and reservoir do you prefer on your builds?
I like the 240 Volvo style reservoir and have used them exclusively for the last 9 years. Some times you can get a bleeding problem with disc brakes running a residual valve, but nothing a jack to elevate the MC above the disc's will not solve.
Re: First Build thread of 2015 and of the new Forum - Lorett
As Joe gets the body prepped for painting and flaking, I took some time off to head up to Troutman, NC to pick up my transaxle back from being re-built. While I did not have the issues I've had in some, it did pop out of 3rd gear under heavy acceleration from time to time, and had a constant seeping from somewhere near the nose that I couldn't fix by snugging up the bolts. It also had been covered in oil, grease, and silicone sealant. The last thing I wanted was to have an incredible chassis and body, without doing some drivetrain upgrades.
I reached out to Jeff Huber at [url]http://www.geargaragenc.com//url] and did asked for a quote. Jeff is a sponsor of the Manx on the Banx event, and had dealt with a few of the Manx Club members. He is definitely a buggy guy, owning several Manx style buggies (he's got one for sale that was featured in Dune Buggies and Hot VW's Magazine, and is incredible), and a custom Tow'd that he's putting together. I had actually spoken with him a while back about a Thing that he was selling, and he was also recommended by a couple of people in the club.
One of the first times I ever asked Joe about transmissions, he did tell me that a good builder won't just quote you a price, but will ask in depth questions about speeds, motors, tire size, intended usage, etc... Jeff did just that, along with a lot more questions.
During the build of the trans, Jeff was great to work with. He was able to pass on some savings to me on some parts he had saved on, and also found a set of Thing output flanges for a great price, as I'm going with Type 2 CV's with Thing output flanges and stub axles.
I dropped off my trans on the way to deliver Loretta up to Joe, and a few weeks later got the call that it was ready to pick up.
I couldn't be happier with the way it looks, with his reputation, I'm sure it will work as good as it looks, or better (if that's possible).
(Loretta) Manx # M2940D910E on customized 1970 chassis that has been "Wheelerized" by Joescoolcustoms
(Scarlett) Manx Resorter #12 (R0012B931S) on 1969 chassis.
(Gunther) Manx 2 # A0202A035E
Tow'dster # TF530G913S
Original Home built buggy that I learned to drive in back in 1995 (the one that started my passion).
Club Member # 4436
Loretta: http://www.manxclub.com/forum/viewtopic ... t=3365Manx" onclick="window.open(this.href);return false;
(Scarlett) Manx Resorter #12 (R0012B931S) on 1969 chassis.
(Gunther) Manx 2 # A0202A035E
Tow'dster # TF530G913S
Original Home built buggy that I learned to drive in back in 1995 (the one that started my passion).
Club Member # 4436
Loretta: http://www.manxclub.com/forum/viewtopic ... t=3365Manx" onclick="window.open(this.href);return false;
- joescoolcustoms
- Posts: 286
- Joined: Mon Jun 03, 2013 5:00 am
- Location: Saint Albans, WV
Re: First Build thread of 2015 and of the new Forum - Lorett
Since mot of the action and drama items are done, not a lot to show for the last week worth of work. Just sanding, spot filling, sanding, spot filling, sanding..............my arms are tired.
A few pictures are interesting, others are, well, you decide.
Initially I use a DA Sander with 80 grit pads to prep a body. Knock the slick finish off of the gell coat and to rough in the fiberglass repairs. Never Ever go across a body line or corner with a powered sander. You will loose the smooth radius of the edge and it is a PITA to re-establish. Corners and edges are hand sand only.
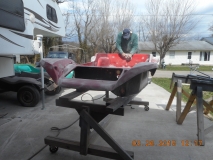
It is handy to flip the body to gain easy access to the insides where the doors have been repaired.
I ground the repair seam of the tiny voids down to a shallow "V" groove.
I have this 20 ounce Roving fiberglass cloth that is for use in serious repairs for strength. It is also handy to pull the individual strands out of for thin repairs, like filing a long Vee groove.
Pre-cut to length and sort out to be ready once the resin is mixed.
And glassed in. Although I could have mixed up a batch of Cabosil to fill it, it would not have had the strength that filling it with stranded glass will give. And resin alone is not the way to do it. Typical to my repairs, I over build it so the repair can be ground/sanded back close to original profile.
Roughly ground down and ready for finish filling and sanding.
On to other surfaces for filling the nit picky voids and areas. And more sanding.
Sprayed some Slick Sand Polyester primer surfacer. The Polyester is catalyzed using the same material as the resin, and set up nicely. Really nice to work for filling in those very slight imperfections and shallows.
The body and hood block sanded, again, washed and dried awaiting the rain to pass for a full coat over the hood and body.
With some prodding and coaxing, I was talked into finishing the project, well, to make it a finished roller. Brian will still have a lot to do to it to make a full buggy. But, while the body is separated from the chassis, continue and give Loretta a final top coating. The original finish was 10E Brilliant Red Metal Flake. Brian wants to remain true to the origin of the buggy body and return it mostly to the original look with a couple subtle upgrades.
So, Meadowbrook Inventions, Inc. was called upon to supply the 10P Brilliant Red Metal Flake. The "P" stands for Polyester Flake instead of Metal flake. It is the newest technology. Looks the same in the final form.
10 pounds of 0.008 10P Red arrived yesterday. The Lazer Red base coat arrived today, and if weather permits, the hood may get sprayed this weekend.
A few pictures are interesting, others are, well, you decide.
Initially I use a DA Sander with 80 grit pads to prep a body. Knock the slick finish off of the gell coat and to rough in the fiberglass repairs. Never Ever go across a body line or corner with a powered sander. You will loose the smooth radius of the edge and it is a PITA to re-establish. Corners and edges are hand sand only.
It is handy to flip the body to gain easy access to the insides where the doors have been repaired.
I ground the repair seam of the tiny voids down to a shallow "V" groove.
I have this 20 ounce Roving fiberglass cloth that is for use in serious repairs for strength. It is also handy to pull the individual strands out of for thin repairs, like filing a long Vee groove.
Pre-cut to length and sort out to be ready once the resin is mixed.
And glassed in. Although I could have mixed up a batch of Cabosil to fill it, it would not have had the strength that filling it with stranded glass will give. And resin alone is not the way to do it. Typical to my repairs, I over build it so the repair can be ground/sanded back close to original profile.
Roughly ground down and ready for finish filling and sanding.
On to other surfaces for filling the nit picky voids and areas. And more sanding.
Sprayed some Slick Sand Polyester primer surfacer. The Polyester is catalyzed using the same material as the resin, and set up nicely. Really nice to work for filling in those very slight imperfections and shallows.
The body and hood block sanded, again, washed and dried awaiting the rain to pass for a full coat over the hood and body.
With some prodding and coaxing, I was talked into finishing the project, well, to make it a finished roller. Brian will still have a lot to do to it to make a full buggy. But, while the body is separated from the chassis, continue and give Loretta a final top coating. The original finish was 10E Brilliant Red Metal Flake. Brian wants to remain true to the origin of the buggy body and return it mostly to the original look with a couple subtle upgrades.
So, Meadowbrook Inventions, Inc. was called upon to supply the 10P Brilliant Red Metal Flake. The "P" stands for Polyester Flake instead of Metal flake. It is the newest technology. Looks the same in the final form.
10 pounds of 0.008 10P Red arrived yesterday. The Lazer Red base coat arrived today, and if weather permits, the hood may get sprayed this weekend.
- joescoolcustoms
- Posts: 286
- Joined: Mon Jun 03, 2013 5:00 am
- Location: Saint Albans, WV
Re: First Build thread of 2015 and of the new Forum - Lorett
I caught a window in between rounds of rain and shot 1/2 gallon of Slick Sand on the body and hood. It will be cured so I can work them Saturday and maybe spray some on Sunday.
I am super pleased with how the Battery and tire well turned out. The battery does not even looked like it is altered and raised. One little pencil thin void about 1 inch long I missed in the tire well to fill and you cannot even tell it has been hacked/repaired.
The huge holes for the tail lights has also turned out really nice. I cannot feel either underneath or on the exterior where they have been repaired. I think the only way to tell they have been repaired is the thickness. My repair is very consistent, maybe too consistent compared to the rest of the body.
The four areas of repair where the doors were pieced back together still need some attention to disappear, but that was expected and will all be worked out with just primer.
The hood also came out very nice and straight. May require just a touch more primer where the "Air Vent" was hacked in, but may flatten out with this second coat.
So, sand Saturday tomorrow. Anyone up for it?
-
- Posts: 1
- Joined: Sat Jan 31, 2015 4:56 am
Re: First Build thread of 2015 and of the new Forum - Lorett
Looking really good. Maybe we should paint that body a darker color? I'm thinking maybe a MOSS GREEN Metal Flake?